Folded Star
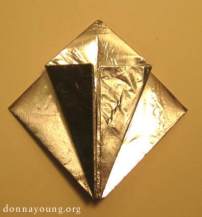
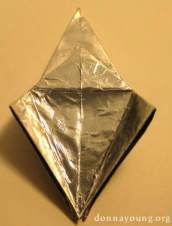
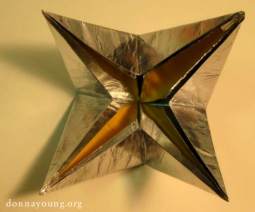
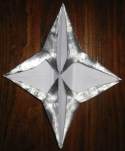 From a square sheet of paper, you can make a folded star. The star pictured is made from one sheet of 32 lb. paper and a piece of aluminum foil that is slightly larger than the paper.
Homemade Foil-backed Paper for the Folded Star:
1.
For this folder star, get one sheet of paper and one sheet of aluminum foil that is at least 9.5 inches long.
2.
Cut the paper to square - this makes the paper around 8.5x8.5 inches long if using printer paper.
3. Glue the dull side of the foil to the paper. I used *rubber cement.
* If you use rubber cement, please read the warning label first.
Materials
- Foil-backed paper (wrapping paper or homemade, see above)
- Scissors
- Ruler to make the paper square (or use fold techniques to make the square)
- Ribbon
- Glue
Step One
If you haven't already, cut the paper into a square. A square that is 8.5 " x 8.5 " will yield a star that measures 8.5" x 7".
Find the center of the paper. If you want this to be educational, have your  children find the center. It can be done several ways, here are two of the ways.
1. Fold the paper in half both ways (either side to side or corner to corner). The place where the lines intersect is the center.
2. Lay a ruler from corner to corner and make a very pale line at around the center area. Lay the ruler across the other two corners (corner to corner) and draw a faint line that intersects the first faint line. Where these two lines cross is the center.
Step Two
 Fold the paper.
Bring each corner of the square sheet of paper to the middle of the square and fold the paper.
Press each fold well.
Step Three
 Fold the paper in half from left to right.
Press the fold well.
Unfold what you just did.
This makes a "prefold" that makes Step 5 easier.
Step Four
 Fold the paper in half from top to bottom.
Press the fold well.
Step Five
 Holding the corners near the bottom, push in the direction of the arrows so that the paper forms a small square.
Step Six
 Fold the flaps firmly, then open the flaps and fold the other flaps firmly.
Step Seven
 Fold the flaps up toward the middle of the square.
Step Eight
 Turn the paper over and fold the other two flaps up in the same manner.
Step Nine
 Fold the top down, press firmly.
Step Ten
 Open the three flaps that were just folded.
Step Eleven
 Hold the bottom corner and gently pull the corner on the other side up.
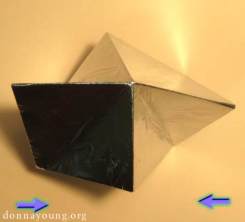
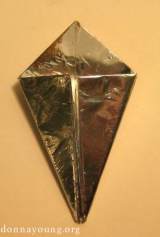
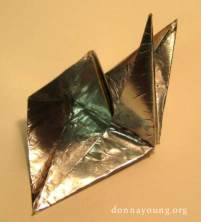
Step Twelve
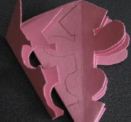
 The flaps that were previously folded in one direction will now need to be folded in the other direction so that the star will lay flat as shown in the photograph.
Note: There will be an image showing the refolding in step 15.
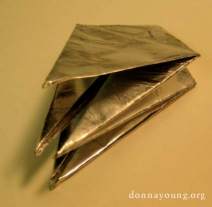
Step Thirteen
 Turn the star over.
Open the flaps as shown in the photograph.
Hold the bottom corner and pull the back of the star up.
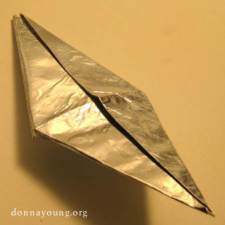
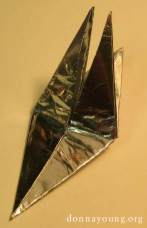
Step Fourteen
 This photograph shows the back of the star being pulled up.
Notice the flaps that will need to be refolded in the other direction.
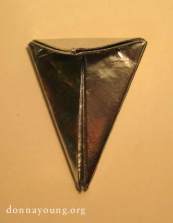
Step Fifteen
 This photograph shows the side on the right being refolded.
Step Sixteen
 This photograph shows that both flaps have been refolded. Press on all of the folds.
Step Seventeen
 Fold the top down.
Step Eighteen
 Fold the top flap down, then back up.
Take hold of the two points that are inside the star. Pull out gently.
Step Nineteen
 This photograph shows the star partially pulled into shape
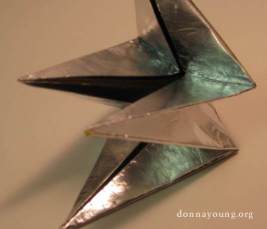
Step Twenty
 This photograph shows the star almost pulled to shape.
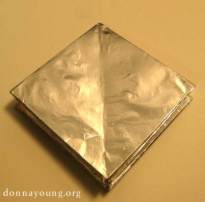
Step Twenty-one
 This photograph shows the star pulled into shape.
Make any adjustments to the star.
Optional: String a ribbon or thread through the fold near the upper tip of the star to make a hanging loop.
Optional: Add a dab of glue to the points in the middle of the star to keep them in place.


 Math and Art
 The only dated "wall" calendar that I have was expiring this year (and I just removed it from the page) and I made another wall calendar to take it's place. It's made in the same style as the Colonial Set.