Sighting when Drawing
Sighting is a jump from Drawing Ia because students are drawing from life and they will convert a 3-D object into a 2-D object on their paper. They will observe real objects and draw them. Sighting with a viewfinder helps the child by framing the subject, giving it a defined space, rather like the Drawing Ia sheets in which everything is inside a small square. Sighting sticks are useful for comparing objects with each other in the composition.
Viewfinder

First you need to make a viewfinder. The image on the right is of our viewfinders.
How To Make a Viewfinder
Use a sturdy piece of card stock that won't curl when it is picked up.
Cut a rectangular hole [the viewfinder window] in the card stock. The hole should measure 3" x 4" if you are using 9" x 12" paper.
If you are using 12"x18" paper, cut the viewfinder window to measure 3" x 4 1/2"
The suggested sizes above indicate that these viewfinders are meant to frame the scene or subject so that the artist knows the edges of the viewfinder window represent the edges of the paper.
 After cutting the hole, trim around the hole. Be sure to make the border wide enough to support the missing middle of the viewfinder. Our big viewfinder had enough support with a border that is just over one inch wide. A wider border would have been okay too. I taped around the edges to keep it tidy and to add extra support.
Viewfinder
Viewfinder is straight when held up. I found our old viewfinder and took a picture to show you how it should be. There are no kinks or folds of any degree. If a viewfinder is damaged, discard it and make another one.
What to do with a Viewfinder
 The student looks through
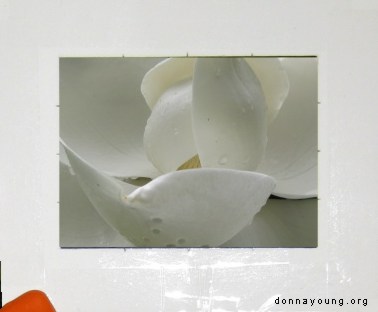
the hole of the viewfinder to sight objects and to block out negative space. For the sake of a lesson, set up a simple still life. This can consist of a single large flower. The image on the left is an image of a viewfinder and a large southern magnolia blossom from our tree.
The student looks through
the hole of the viewfinder to sight objects and to block out negative space. For the sake of a lesson, set up a simple still life. This can consist of a single large flower. The image on the left is an image of a viewfinder and a large southern magnolia blossom from our tree.
If you notice, now you have just lines, shapes, and shading to replicate on your paper. The science behind drawing is observation. The artist must notice the little details such as the reflected light along the edges of the lines, the edges and their direction and shape, and the gradated tone of the shadows.
Stabilizing the Viewfinder
If you can imagine, your viewfinder cannot move nor can you hold it while you draw. The viewfinder has to be attached to something or standing with the help of something. Use what you have around the house. I have big spring clamps and that is what I use. I can clamp the viewfinder to the side of the easel or I can clamp it to something else, or I can add two clamps to the bottom of the viewfinder to serve as "legs." In any event, the viewfinder should be eye level to the artist because the artist can't be stooping and bobbing her head. It needs to be at that perfect height so that when she glances through the viewfinder, her view is the same as the last time she glanced though the viewfinder. See Blind Contour Drawing [when I write it].
Sighting Sticks
Sighting sticks are sort of like a viewfinder, but not really like them at all. The sighting stick has rules.
Rules: The sighting stick should be straight and thin. Ours is pictured to the right.
When holding a sighting stick, it must exist in this imaginary 2d plane in front of you at arms length. That means you can tilt the stick like the angle of clock arms, but like clock arms do not reach out or in, you may not tilt the stick out of its 2d realm.
Sighting sticks are used to measure and compare the parts of your subject. Remember to follow the rules. It is a waste of time if one tilts the stick forward or backward, or bends their arm. Just follow the rules and do it right.
Use of Sighting Stick
The sighting stick is used for several things.
- Comparing the sizes of the different elements in the still life or model
- Checking the angles of lines against the vertical and horizontal lines of the stick
- Sighting a reference object to be drawn first and sighting the other objects from the reference object
A Still Life
 Start with one or two objects in the still life. Place simple objects
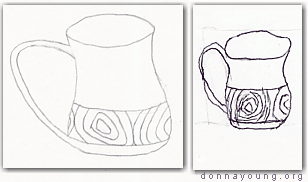
such as a ball and a candle as the first subjects. Or do as I did and place one handmade mug as the subject. The mug and resulting drawings are pictured below.
Start with one or two objects in the still life. Place simple objects
such as a ball and a candle as the first subjects. Or do as I did and place one handmade mug as the subject. The mug and resulting drawings are pictured below.
Instructions: Set up your still life. The students are to sight the objects by holding up their sighting sticks in the proper position according to the rules. Tell them they should not tilt their sticks forward or backward. They will use their thumb nail to hold the measurement on the stick when comparing sizes of items.
Their purpose is to discover the shape and direction of the lines of the object by comparing it to the straight line of their sighting stick.
The sighting stick was used in this still life to determine if the cup is taller than it is wide or visa-versa. It was discovered that the cup is almost a square, but not quite. Shading is not to be done in the first few exercises.

Notes: Some children may dislike sighting, [mine never said, "Hey! Let's use a sighting stick for art!"] but if you can encourage them to learn to use the sighting stick properly it should help them. Make each still-life very simple until they get better at the skill of sighting.
Once they are used to sighting an object, make each still life with two or more objects, one small and one large. Instruct them to sight the small object first and compare it to the larger object(s). see important point #4
When they are able to compare objects and draw them to the right proportions, introduce foreshortened objects into the still life. A large doll or stuffed animal that can be place in a sitting position might be a good start. The legs would be foreshortened if you could place the doll up high enough so that the legs are about eye level to the artist. see important point #3
If you want your children to shade the objects in the still life, set up a light source. Either place the still life perpendicular to a window or set a lamp near the still life.
- Hold the stick at arms length
- Keep the stick straight, vertically or horizontally
- The tendency to tilt the stick should be avoided
Foreshortened objects can be drawn accurately if the stick is held straight - Measure the smallest thing first to compare with the other
objects...
If an apple is the smallest thing in the composition, then use it to measure how many apples high or wide a larger object is.
Meanwhile, as your student gets better with using the sighting sticks, add shading to your art lessons. [See Shading] In the still life provide a strong light source such as a desk lamp so that the objects in the still life will have distinct shadows. Practice improves shading.
As your student improves, make the still life more complicated.
- Always try to make a pleasing composition with the objects in the still life.
- After many lessons, place an item that will be foreshortened when
drawn.
Foreshortened is how something looks when it is pointing at you. Foreshortened items are challenging to draw. But not really, the real challenge in drawing a foreshortened item is the challenge to the preconceived notion of what something looks like and its typical representational length. A foreshortened item use much shorter lines. - Feel free to move outside and draw trees or other objects.
- Sleeping pets make good models too.
- From time to time, have one of the students be a model for the other students to draw.
- Break up these sessions with rapid contour drawings [also called gesture drawings]. Allow the students to draw their hand, feet or an object of their choice without using a sighting stick and without glancing at their paper very much. They should study their subject well before beginning the contour drawing, then draw quickly, their pencil following the movement of their eyes as they look at the lines of their subject.
- Practice cross hatching. Have your students draw with pen and ink or with pencil. They should use cross hatching to form the shadows in their drawings.
Continue with this until the students have greatly improved from their first attempts.
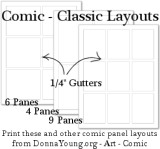 I have added 3 classic layouts - 4-Panel, 6-Panel, and 9-Panel.
 A new organizer - This is "SW"