Lesson 2: Drawing from Graphics - Lessons
If you have read Drawing With Children, Lesson 2, Overview then you have an idea of what you are teaching from this chapter. On this page, I will describe the different parts of chapter 2 (the lesson segments A-F) and I will include several lesson plan schedules. You need the book to do the lessons. This article is not a substitute for the book; my purpose is to help you organize your lessons for this book.

Handouts for Lesson 2
Page xxviii lists the handouts recommended by the author. [Handouts 7-13] Meanwhile, look for graphics of lions, tropical birds, horses, and any other animals that you believe your children will find interesting. Look on pages 96, 102, 113 to see some of the compositions that children have made in this chapter.
A-E, The Drawing Tips and F, The Main Lesson
The drawing tips that lead up to the main lesson begin on page 82* and end at page 92. Below, listed under headings A-E, are the different parts of the drawing tips that can be used in your drawing classes before beginning the Main Lesson (F). The exercises (A-E) prepare the student for the main lesson. At the bottom of this page are several possible lesson plan sequences for this chapter, "Lesson 2: Drawing from Graphics," that you can place in your lesson planner.
A. The Flow Of Contour Drawing, pages 83-85
On page 83 Mona describes a contour drawing exercise. It's really quite simple, so make this the first class of Lesson Two. Please do not overlook the part that says that your children should choose a subject that they have feelings about - either something loved or disliked and draw that item with simple contour drawing. Also, it is important not to miss the part about the subject being engaged in life (as opposed to just standing there like a statue) - that is discussed in the last point of the assignment in the book.
B. Overlapping, page 85
Overlapping is described on page 85 and is illustrated on page 86. You will need something like figure 2.5 that is shown on page 86 for the exercise. I've made two that you may use: Overlap 1 & 2. Also consider setting up a very simple still life for your student to draw. The still life should have simple objects such as a cube and a ball that are overlapping.
C. Making Adjustments and Changes , pages 85-90
M. Brookes says the section, "Making Adjustments and Changes" is very important. If you have made a copy of the figures 2.6-2.9, then consider posting it somewhere that your students will see during art class.
This is explained beginning on page 85 and is illustrated on pages 87 and 89 in figures 2.6, 2.7, 2.9 and 2.9. If you are teaching just one or two students, have them sit next to you when you read this to them so that they can see the illustrations; otherwise, you might need to make a copy of pages 85 and 87.
For this lesson, you will read and discuss pages 85 - 90 stopping at Where to Start.
Making Adjustments and Changes
It is hard to find examples, [here is one] but x-rays have shown that artists have changed their minds about their work in progress. They've changed line angles, shapes - and well - anything that they decided was not quite right according to them. Professional artists do not always "get it right" the first time. Art is work and it is a skill.
- Donna Young
 Where to Start, page 90
Where to Start begins on page 90. This is not a lesson, this is a teacher's tip. When your student is staring at the blank sheet of paper, Where to Start offers suggestions.
D. Preliminary Sketches, pages 90-91
The preliminary sketch exercise is explained on page 91, and introduced on page 90 beginning with "Projecting the image on the paper," which is a mental exercise, and the drawing part of preliminary sketches is illustrated in figure 2.14 on page 96. I don't want to confuse you, but the preliminary sketches are a part of the "Main Lesson," but I am listing it here as if it isn't. Preliminary Sketches are taught to the children and practiced by the children before the main lesson. Preliminary sketches are done again during the main lesson.

Entrée des Croisés
à Constantinople
NOTE: If their paper is 9" x 12", then the box to represent that size of paper should be approximately 3" x 4". If you have your students draw the boxes, I want to say that the box size does not have to be drawn exactly to scale, but it helps to be close if the compositional study is of the entire drawing.
The students could simply quarter their drawing paper by folding it in half both ways and then opening the paper and make sketches in the four areas divided by the fold lines.
As shown on page 96, the children are to draw boxes on a piece of paper and in those boxes, create some compositions using the character that they drew in Lesson One. If they drew the lion, it would be handy to have some pictures of the places where lions live for the children to look at while thinking about what they would like to draw.
Optional Printable Files for the Preliminary Sketches
While I think it is a better idea for children to draw the boxes, here are boxes in two sizes: 3x4 and 3x4 1/2. Use 3" x 4" if using 9" x 12" paper and if using 12" x 18" paper, use 3" x 4 1/2". 3" x 4" is available in vertical and horizontal. Of course the paper could just be turned to suit, but I placed my web site address on the paper so you wouldn't forget where you found it and a child might not want to turn a paper if it makes words sideways.
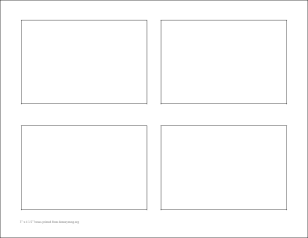
![]() I have to point out something - Be sure to click on the little image [pictured above] to see an example of a compositional study. Please note that the boxes are not the same size like they are in my printable files. Look again at the illustration on page 96 - figure 2.14 - those also are not the same size. In both examples, the "preliminary sketches" are not only of the whole composition, but they are also of parts of the composition. I just needed to point that out before I finished this part.
I have to point out something - Be sure to click on the little image [pictured above] to see an example of a compositional study. Please note that the boxes are not the same size like they are in my printable files. Look again at the illustration on page 96 - figure 2.14 - those also are not the same size. In both examples, the "preliminary sketches" are not only of the whole composition, but they are also of parts of the composition. I just needed to point that out before I finished this part.
Almost Related: Art: Sighting with a Viewfinder
E. The 5 Tips on Pages 91-92
There are five more tips on pages 91-92 and each one could be a class in itself. Whether each one takes a class is up to you.
 Five more tips are sort of hanging around pages 91 and 92 with no numbered lists or anything to make you pay attention to their value, so you might miss them. I'm writing this to make sure that you don't. I know that your student will benefit from hearing about the tips and from practicing the tips. They begin near the bottom of page 91 (following Making preliminary sketches.) and continue to the end of page 92.
If you have time to spend on the tips, and I hope you do, I suggest that you have the markers and paper out for the children so that they can practice the tips that day. You could spend several days on the tips. Each tip has a set of instructions.
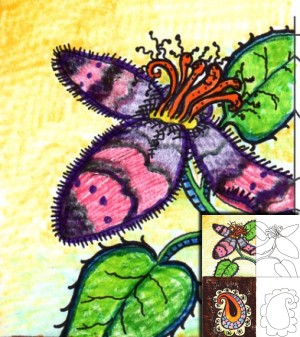
Optional Printable File to use after practicing each of the tips as described in the book. The printable file has two drawings on one side and the same two drawings flipped (mirror image) on the other side. One is a flower and the other one is a simple paisley design. With markers, the student should use the techniques learned from The Tips on pages 91-92 to dress up the plain drawings. Flower and Paisley [PDF]
Related Art Drills - Shading
The author mentions Creating flat, textured, or shaded areas at the bottom of page 91. At your discretion and based on the abilities of your students, you can assign drills in the aforementioned. I used Ruskin's Shading Drills for art classes throughout the years- See Ruskin's Shading Drills at: Shading Drills.
F - The Main Lesson
Prepare, you can't just open the book and start
Turn to page 114 and copy the list in your planner because the steps on the list are the steps that you will take for the lessons and for your homemade lessons. Not only is this easy, you are told not to worry about the structure spoiling creativity because creativity thrives within structure. When you look at the list, you might think to yourself that you will need to clear 2 hours for the class, maybe 3, but don't worry about that yet.
The Main Lesson - where to start
Choose a Level and Follow the Lesson from the Book - don't forget to follow the list on page 114.
Level one starts on page 93
Level two starts on page 99
Level three starts on page 106
Do we have to complete an entire lesson in one sitting?
No, a lesson can be spread over several days. I want your students to benefit from learning the thought process involved in composing a drawing. Additionally, parts to the lesson could take one class: 1. the preliminary sketches; 2. drawing the full sized picture; 3. adding details. If the student wants to draw the same subject with a different background, that could be another lesson for another week (and of course the student is always free to draw anything in his or her spare time.)
Donna
More Lessons
If you want to offer your children more step by step drawings, look into the Draw · Write · Now · books. These books combine drawing and handwriting. Otherwise, provide graphics and some guidance when drawing additional pictures. Use the steps on page 114 and be sure to read page 112.
2 Sample Lesson Schedules for- Lesson 2: Drawing from Graphics
Below are two sample lessons
-
I am providing the sample schedules so that--
- you can get started devising your own lesson plan
- you can choose one of the sample lessons below to use
Throughout the classes, refer to the book, Drawing with Children, to make sure the lessons fulfill this chapter's objectives.
Be sure to remember that this chapter builds on the lessons learned in the previous chapter, so remember to do warm-ups, relaxation, and occasionally review the basic elements of shape.
Sample Lesson Schedule One - Minimum 15 Classes
Class Sequence Options - "How many weeks to devote to Lesson 2 and cover the material?"
- Class everyday for 3 weeks
- Class 3 times a week for 5 weeks
- Class on every other school day: -- > Mon., Wed., Fri. during one week and Tue., Thur. during the following week. This takes 6 weeks
Below are the components of the lesson plan. I have linked them to the descriptions on this page
A . Contour drawing - 2 classes
B. Overlapping - 2 classes
C. Making Adjustments and Changes - 1 class
D. Preliminary Sketches - 2 classes
E. The 5 Tips - 3 classes
F. The Main Lesson - 5 classes
| A | A | B | B | C |
| D | D | E | E | E |
| F | F | F | F | F |
After this, move on to Lesson 3 or work on another Main Lesson (F)
Sample Lesson Schedule Two - 5 Weeks Minimum
This schedule is a theme week type of plan and this plan gives the student more time to practice The 5 Tips.
Class Sequence Options - "How many weeks to devote to Lesson 2 and cover the material?"
- Class everyday (or 4 days a week) for 5 weeks
- Class 3 times a week for 8 weeks
- Class on every other school day: -- > Mon., Wed., Fri. during one week and Tue., Thur. during the following week, OR two days a week
Class Everyday or 4 Days a Week - 5 or 6 Weeks
Week 1: A - Contour Drawing - practice contour drawing
Week 2: B & C- Overlapping and drawing adjustments, go over drawing adjustments and practice drawing overlapping objects (Students may practice drawing adjusts on their overlapping objects drawings.)
Week 3: D- Preliminary sketches, make several compositions this week.
Week 4: E- The 5 Tips
Week 5: F- The Main Lesson
Optional - Week 6: F- Another Main Lesson
Class 3 Days a Week - 8 Weeks or More
Week 1: A - Contour Drawing - practice contour drawing
Weeks 2 and 3: B & C- Overlapping and drawing adjustments, go over drawing adjustments and practice drawing overlapping objects (Students may practice drawing adjusts on their overlapping objects drawings.)
Week 4: D- Preliminary sketches, make several compositions this week.
Weeks 5 and 6: E- The 5 Tips
Week 7 and 8: F- The Main Lesson
Optional - Week 9+: F- Another Main Lesson
Class 2 Days a Week - 11 Weeks or More
Weeks 2 and 3: A - Contour Drawing - practice contour drawing
Weeks 4 and 5: B & C- Overlapping and drawing adjustments, go over drawing adjustments and practice drawing overlapping objects (Students may practice drawing adjusts on their overlapping objects drawings.)
Week 6: D- Preliminary sketches, make several compositions.
Weeks 8 and 9: E- The 5 Tips
Week 10 & 11: F- The Main Lesson
Optional - Week 12+: F- Another Main Lesson
Consecutive weeks: Continue this type of lesson until you want to move on. Keep the teaching points of the lesson in mind:
- planning compositions with overlapping objects
- observing the effects of color, texture, and shading - bottom of page 91 through 92
- the feeling/action of the subject in the drawing such as: leaping lion and swaying grass
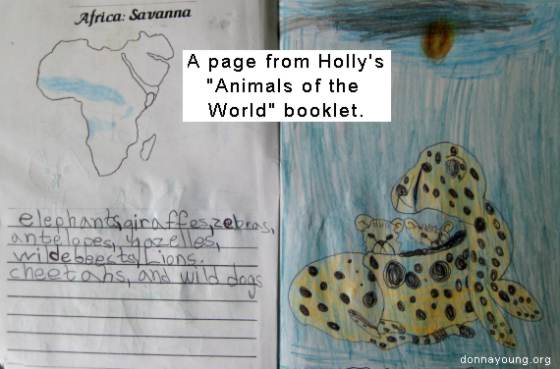
Other: Lessons learned from this class can be implemented into other subjects such as making a state flower booklet, an Animals of the World booklet, a Days of Creation booklet, illustrating a story ... etcetera. (see next)
 Application
Maybe you've noticed this little booklet that I've posted images of in the art section of DY (or not). This little booklet is an example of how your child can apply the skills learned in chapter two to enhance learning in other subjects.
Drawing the Animals of the World
Donna Young, article revised January 26, 2014
Notes and References
* Page numbers are based on the book published in 1996.
The image of the book is a scanned image of my copy of the book.
 While getting the site-cd updated I noticed the super-nifty "Surrounded by a Calendar" row planners
 Cube Templates